Showing posts with label stamping. Show all posts

Tuesday, April 19, 2016

Square Stamp Project


I was asked to come up with something to do with the Activity Days girls at church. I thought it would be fun to make some wrapping paper, so I put together some stamps--square, so they could be stamped in a grid pattern.   I didn't get any pictures of the stamp-making process, but here's the aftermath.


We found out right before this that our stake was being split and the ward boundaries changing, so this was the last activity with this group of girls all together. Everyone showed up, and we had more girls than stamps, but we made it work.


I didn't have time to make any samples ahead of time, to show them the grid effect, so they were pretty much all over the place. I don't know if they would have had the patience to do it that way, anyway.  Here are a couple that I did later:


We ended up with a few sheets of paper randomly and colorfully stamped all over, and we just cut them into pieces and let everyone take one home. It was a little crazy and messy (we went through a bit more paint than necessary), but I think they enjoyed it. And I added a few more stamps to my collection!

Sunday, February 14, 2016

The Valentine Project


In the midst of all the opera painting, I was also working on Valentines. I was asked to help out with a Relief Society activity, and also helped Kate make some for her class.


I got some gelli printing and stamp carving done ahead of time, but no actual Valentine-assembly happened until Wednesday night. I was thinking Kate's class party was gong to be on Friday, but she came home and told me it was on Thursday, so we had a late night Valentine-making session.  As it happened, I'd been super tired for the first few days after theater load-in, but on Wednesday I suddenly got this great productive burst of energy (still trying to figure out where that came from and how I can make it happen again!) so we just buckled down and got it done.  I did the front sides of the cards and she added a personalized message and drawing on the back of each one. 


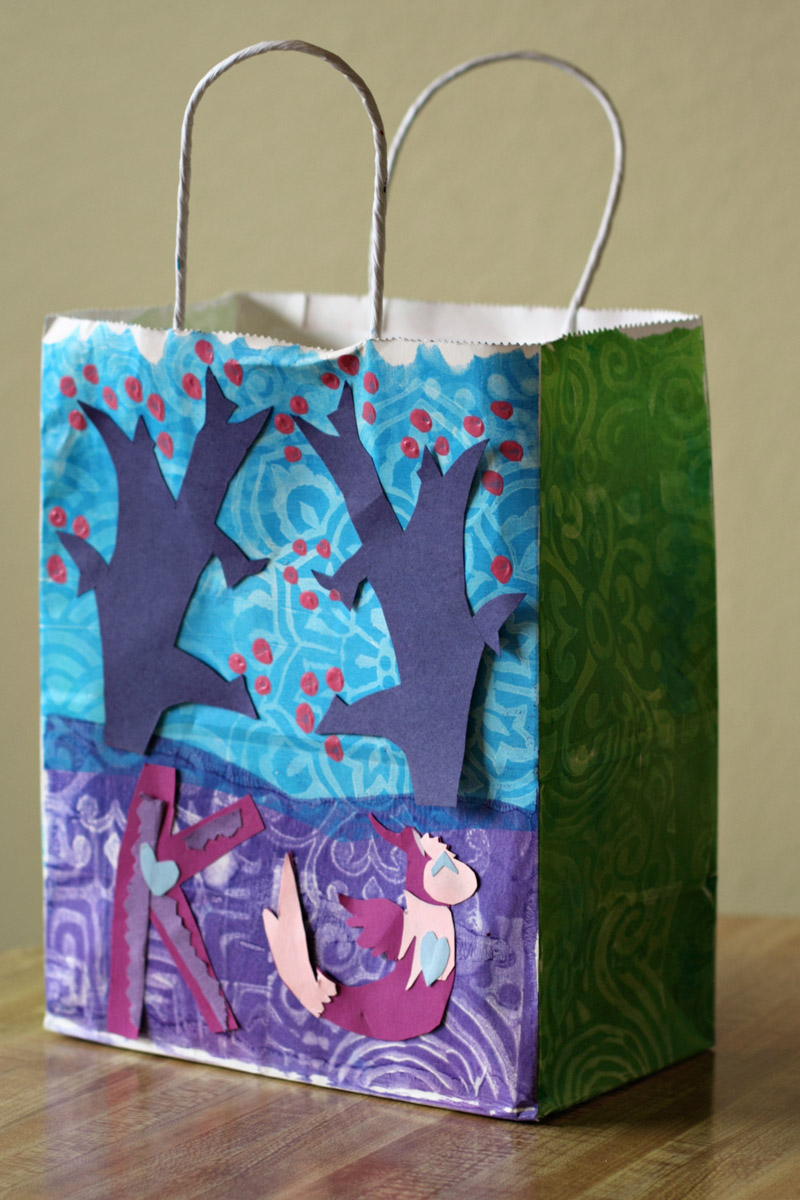
Kate brought home a bag from school to decorate.  She cut out some paper pieces, and I did some gelli printing on the bag before she glued them on.

I've been watching mixed media tutorials on YouTube,  and I have a lot of things that I want to try.  I did play with stencils and molding  paste a little (which we ended up using on the cards for Kate's teachers, but I didn't get a picture), and I got some Tim Holtz distress ink and a blending tool.  Cool toys!  I need to experiment with that a bit more.  I have this problem--I have tons of ideas and things that I want to try, but when I'm feeling most productive is usually when I'm busy doing other things.  Isn't that always the way? 

Monday, February 01, 2016

Stamped Skirt (보리밭 치마)


My first attempt at painting and stamping on a skirt!  I've had this in mind for quite a while, but it took some time to figure out exactly how I was going to do it. 

I used Jacquard Textile Colors on a white skirt from Dharma Trading Co.  (this one is unfortunately discontinued--I snagged two before they were gone!)

I learned some interesting things while working on this project:  (1) It's almost impossible to get a precise placement and a good print with an already-put-together garment on a gelli plate. (2) Jacquard Textile Paints will wash out pretty well, if you do it right away. I went through a couple of false starts before I got something I was happy with. I did use the gelli plate for the background--rolled out a thin layer of paint and just pressed the fabric randomly onto it for a blotchy, distressed look, which was pretty much what I was going for.


The text is the lyrics of 보리밭 (a song about walking through a barley field). At first I made a big forward-facing stamp (so I could use it on the gelli plate) using puff paint on craft foam, but I just couldn't get the print placed correctly on the skirt. I realized that only way I was going to get a good print and be able to position it just the way I wanted was by direct stamping. So my project went on hold while I made another stamp.


It's hand-cut craft foam glued onto a clear background.  (This took a very long time, and I'll probably never do it again!)  I split it into two narrower stamps, rather than one big one, so I could spread out the gathers on a small amount of fabric and position the stamp. This is still tricky.  Stamping fabric and then making it into a skirt seems like an obvious solution, but I have to wonder if the paint would gum things up. It does get a little stiff.  Worth a try, maybe. 


The middle tier is all text, and then it dips down into the bottom tier in places. I kept that part more indistinct by rolling the paint on the stamp unevenly and then not pressing down on the whole stamp.  I like the look. 


The big stamp is adapted from a Dancheong pattern. I got eight spaced more-or-less evenly around the bottom.


The apple green color is really bright.  I mixed it with some other colors, but it's still pretty bright. It's a good Korean color, though.  And it came out pretty close to what I'd pictured, so I'm happy with it! Now I have a couple of skirts and some ideas for Kate!

Thursday, September 03, 2015

Kid Shirts!


I made shirts yesterday!  It was a spur-of-the moment thing.  I thought they turned out really cute.  The kids were, perhaps, somewhat less enthused, but they were willing to pose for me. (Conveniently, both of our kids have four-letter names!  Isn't that lucky?)


The idea popped into my head in the morning while I was puttering around, and  I got to work on the stamps right away.  I cut the letters out of craft foam and glued them to another layer of foam. (That's the 5mm Silly Winks from Hobby Lobby--last time I was there they didn't have white so I got pink.)  I think it took me about an hour to do both Kate's and Andy's names. 


I got some Versatex Printing Ink that I have plans for. This was a good dry run. I started out rolling the ink out in a tray and pressing the stamp in it, but then realized that I could get better coverage by brayering it right onto the stamp.


Yes, I'm living dangerously here--didn't put down the drop cloth. No mishaps!


The stamping part was super easy. The hardest part was running downstairs between each color to wash out the brayer in the "work" sink. The orange is a bit brighter than I was thinking.  All the colors are really bright.  It works well here, but I might try to mix them and tone them down a bit for other projects.

That was fun!  What else can I stamp?

Monday, June 15, 2015

Trek Flag (and the Really Big Stamp)


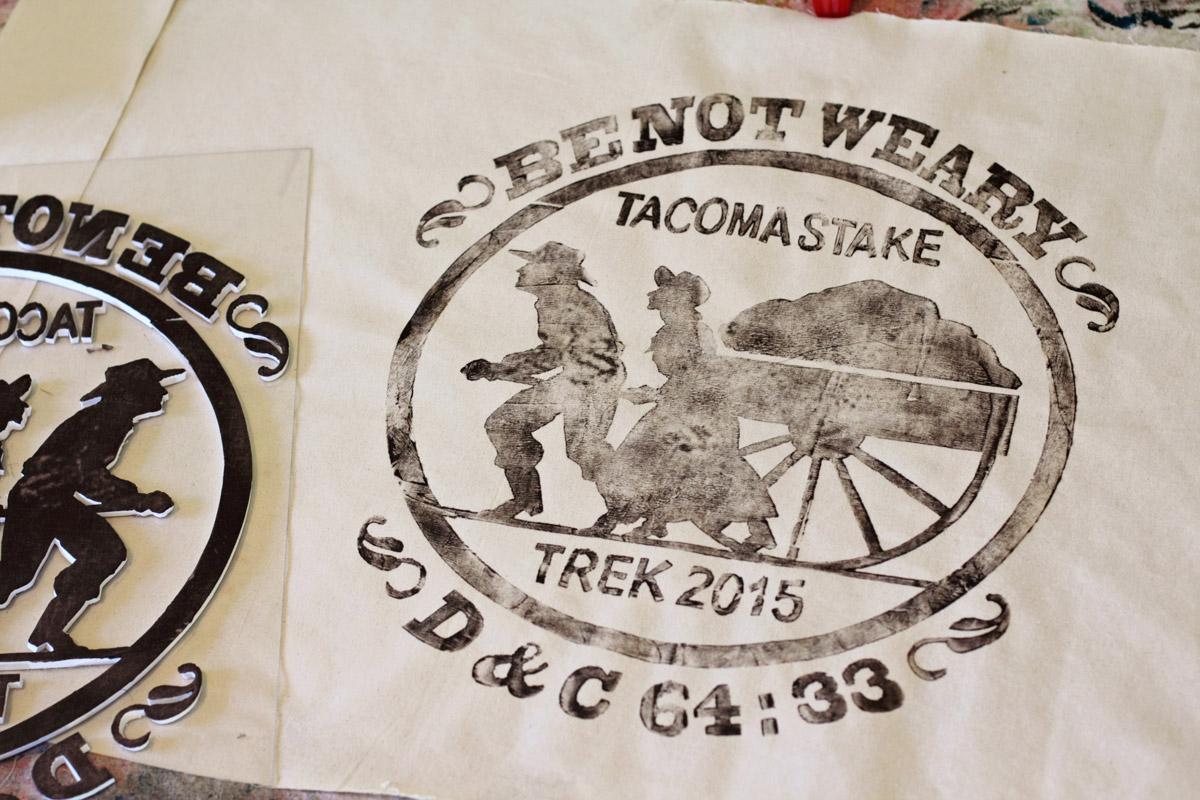
Our stake is doing Trek this year (pioneer reenactment, complete with handcarts), and I was asked to help make a flag.  They had the logo ready, and wanted it blown up and transferred onto fabric.  I was pretty much given free rein in exactly how this was to be accomplished, so I decided to break out the craft foam and make a stamp.  I've done a lot of these but never one of quite this magnitude before.  It's about 18 inches high.

I traced the design onto craft foam and then spent a day cutting out all the pieces.  (Andy was a little too interested in the letters and kept putting them back in the negative cut-out.)  I got a big piece of clear plastic (Hobby Lobby has them in the stained glass section), and glued the pieces to that.  I wanted a clear background so I could place the stamp more accurately, and re-align if I needed to stamp the image more than once.


Today I cleared off the kitchen table and did the stamping.  It's on two pieces of fabric so they can be sewn together back-to-back for a double-sided flag. I applied acrylic paint to the stamp with a brayer, positioned it on the fabric, and hand-pressed it all over. 


On the second side, I mixed some Golden Open Medium with the paint, and it came out a lot darker.  So then I went back and printed the first side again.  (Good thing I had that clear background--I was able to line it up just fine.)

The verdict: it won't replace silk screening, but if you're going for that printed flour sack look, it works pretty well!

Monday, December 29, 2014

Stamping Wrapping Paper

Since I've been making stamps to use with my gelli plate, it occurred to me that I could also use them for making wrapping paper. I got a big roll of white paper and a roll of kraft brown paper, and I've been having fun stamping them.


Kate's friend Kael had a Pokemon-themed party, so I made this wrapping paper for his present. I cut the shapes out of craft foam (Doug helped me get Pikachu's ears right), and glued them onto flooring scraps.


This was for a white elephant gift exchange.

(There were a few others--one where I used potato stamps--but I didn't get pictures.)


So, I ambitiously decided to make all our wrapping paper for Christmas. I started this well enough in advance that I had some time to find shapes and cut out all the fiddly bits. 


Doug cut some plywood blocks for me to mount the stamps on. (I used PVA glue and let it dry overnight.)


I use my brayer to roll out a layer of paint on a piece of plexiglass, and load up the stamp. Or sometimes I turn the stamp over and roll the brayer right on it. That works too. Since the stamps are unfinished wood I can't get them too wet when washing them off, but wiping them with a baby wipe seems to work well enough.


 I thought the Christmas tree stamp worked really well--probably because it's kind of triangular, and they fit together nicely in patterns.


Well, after that I had to do birthday paper too. These were a lot faster--mostly pretty basic shapes. (The cat was adapted from a tattoo I found online.)


I used some other stamps that I had already made up, too. I'm not sure how long all the stamping took me--maybe an hour or a little more. When you've got this much paper you have to have enough room to spread out all the pieces to let them dry, but overall it's not that much of a hassle, as long as you're not trying to do it at the last minute the day of the party. I'm sure I'll be making more in the future!

Wednesday, August 03, 2011

In which we consider taking up letterboxing, and make a stamp

I've had the thought that perhaps we should try geocaching.  We went with some friends once, when Kate was really little.  It seems like it would be a good way to get out and explore new places.  Doug and I are perfectly happy to just explore for the sake of exploring, but I thought Kate might get more into it if there was some sort of goal and payoff.  But we don't have a GPS, so that does present a bit of a problem.

We had a ward activity not long ago which included a brief presentation on fun (and cheap) summer activities, and one friend mentioned that her family has been enjoying letterboxing.  "Oh yeah, " I thought, "We could do that!"  Letterboxing is like geocaching before geocaching was invented.  (Sort of... the two exist concurrently now.)

The two things you need for letterboxing are some kind of little notebook and a stamp.  The book was easy--I have several little books from my bookbinding class at BYU that I've never done anything with.  I thought it would be fun to have Kate draw a dragon and then turn that into a stamp.


We decided to use the one in the middle (that's Toothless!)


I got a block of this rubber stuff called "Moo Carve" at Artco, and did a graphite transfer to trace the dragon onto it.


Carving!  Doug and I had the idea we were going to do some linoleum block carving, several years ago, and got a set of tools.  They've only been used on potatoes and they're rather rusty.


All done!  I need to get some kind of wood to mount on the back, but it works fine for now.


Kate added a scene to this one.

After this she wanted to make more stamps!  I suppose we'll have to do that.