Showing posts with label gelli plate. Show all posts

Sunday, March 05, 2017

Dad's Air Force Quilt


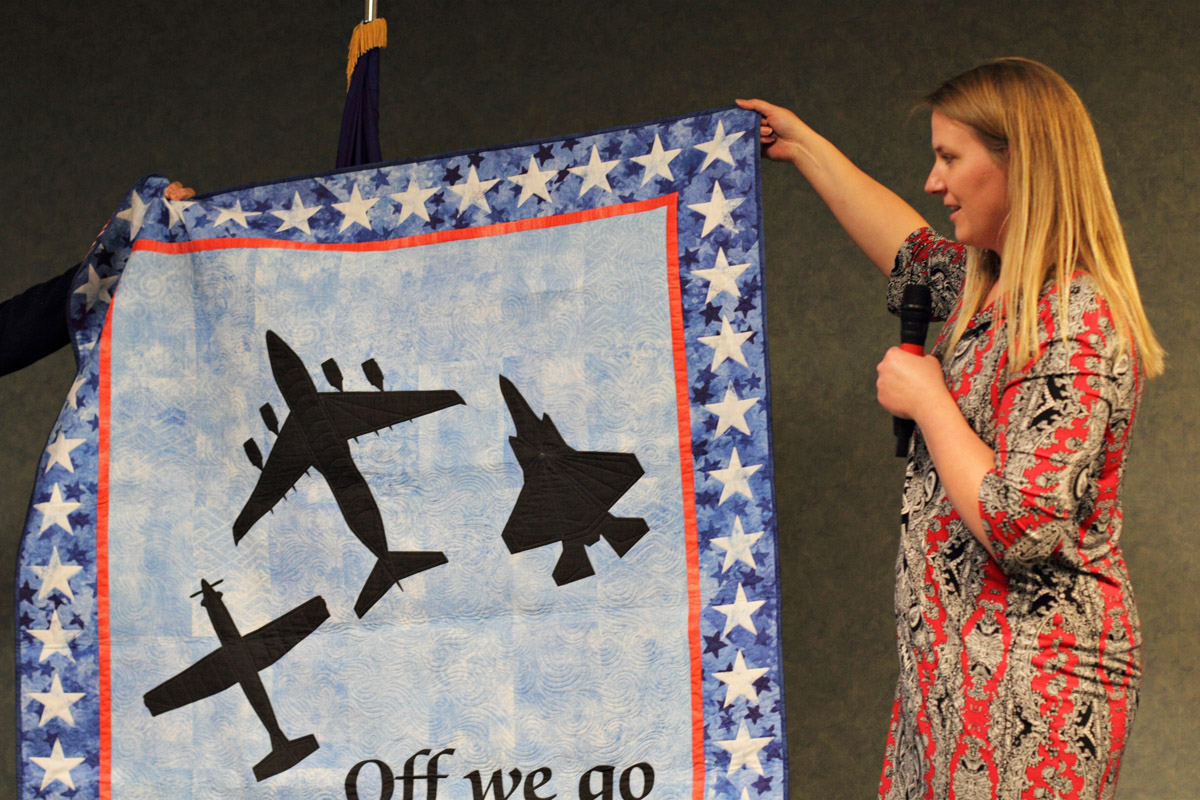
I was able to fly out to Ohio for my dad's retirement ceremony. He's been serving his country for fifty years--twenty years active duty Air Force, and thirty years in civil service. My sister Barb had the idea to make this quilt for him. There wasn't time to piece it, so she called me up and told me what she had in mind, and asked if I could design something digitally and we could get it printed. I put the background together with gelli prints, and created the plane silhouettes in Adobe Illustrator. These are the three main airplanes that he worked on--the T-6, C-17, and F-35.


Barb wanted fifty stars around the border, and I thought they would look good on a background of smaller stars. I made some gelli prints and scanned them.


I made a large star stamp and stamped it with acrylic paint on fabric to get the texture I wanted.


I scanned the stars and made them into Photoshop brushes to put around the border.


Barb and I went back and forth with the image a few times to make sure everything was just right, and then I sent the completed file to Pattern Jam. They printed it out on fabric and sent it to Barb.


Barb put it together and quilted it on her longarm machine. The printing turned out great (the red came out a little more orange than I was expecting), and Barb did a fabulous job with the quilting.


Barb is a longarm artiste!


Presenting the quilt to Dad.


Barb said, "It will keep you warm while you take naps."

It was a really lovely ceremony. Peter sang the national anthem (first and fourth verses, by request), and did a great job. Everyone had lots of nice things to say about Dad.


After the ceremony we had a receiving line. Kirsten sat out most of it. The rest of us thought it would be funny to line up by height.


Betsey and Barb were up late the night before making fudge. I did the labels. I hear it was quite tasty. I think they're still eating that cake.

Barb was the only one who came out with her whole family--Peter and I left ours at home. Our Cousin Mark came from Indiana, and we all had a fun couple of days together. We played some games and ate Korean food and made inappropriate jokes about making fudge.

Congratulations, Dad!

Tuesday, August 02, 2016

Sunset Ward


With our stake splitting and all the ward boundaries being rearranged, we are now in Sunset Ward, and I've been called as the Relief Society Secretary. We got a presidency pic at church recently--I promise there was no wardrobe consultation, it just happened. (Hopefully this bodes well for our working together! We are in sync!)

After working with the cub scouts for over two years I was hoping to be in Relief Society for a while. I get to take attendance, rather than passing the roll around, so that'll help me get to know people.


One of the things I get to do is send birthday cards to all the sisters, and of course I decided I had to make them myself. This is a job for the gelli plate! And I have a whole ream of cardstock I got for a project recently, that turned out to be too heavy to go through our laser printer, but it makes great cards.


I've been making a lot of foam stamps lately, so it was fun to have a chance to try them out. I really like the way this one turned out. Pretty!

Sunday, February 14, 2016

The Valentine Project


In the midst of all the opera painting, I was also working on Valentines. I was asked to help out with a Relief Society activity, and also helped Kate make some for her class.


I got some gelli printing and stamp carving done ahead of time, but no actual Valentine-assembly happened until Wednesday night. I was thinking Kate's class party was gong to be on Friday, but she came home and told me it was on Thursday, so we had a late night Valentine-making session.  As it happened, I'd been super tired for the first few days after theater load-in, but on Wednesday I suddenly got this great productive burst of energy (still trying to figure out where that came from and how I can make it happen again!) so we just buckled down and got it done.  I did the front sides of the cards and she added a personalized message and drawing on the back of each one. 


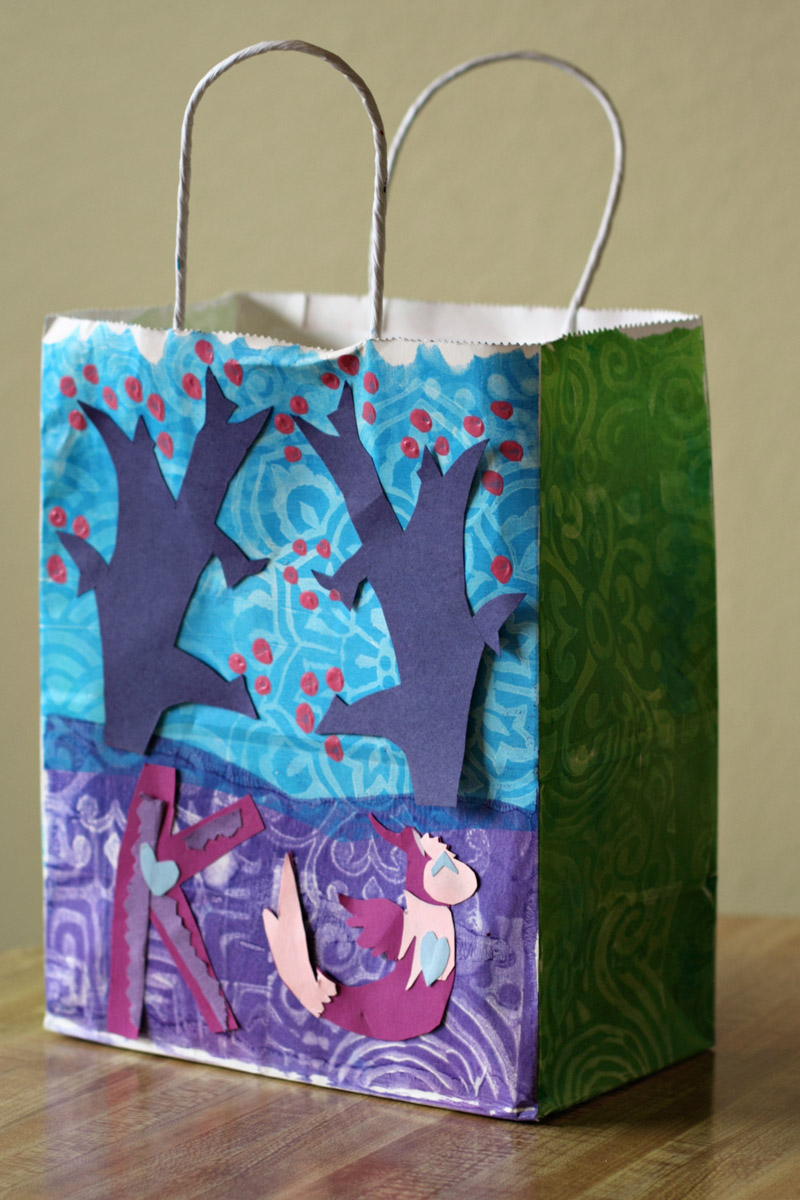
Kate brought home a bag from school to decorate.  She cut out some paper pieces, and I did some gelli printing on the bag before she glued them on.

I've been watching mixed media tutorials on YouTube,  and I have a lot of things that I want to try.  I did play with stencils and molding  paste a little (which we ended up using on the cards for Kate's teachers, but I didn't get a picture), and I got some Tim Holtz distress ink and a blending tool.  Cool toys!  I need to experiment with that a bit more.  I have this problem--I have tons of ideas and things that I want to try, but when I'm feeling most productive is usually when I'm busy doing other things.  Isn't that always the way? 

Monday, February 01, 2016

Stamped Skirt (보리밭 치마)


My first attempt at painting and stamping on a skirt!  I've had this in mind for quite a while, but it took some time to figure out exactly how I was going to do it. 

I used Jacquard Textile Colors on a white skirt from Dharma Trading Co.  (this one is unfortunately discontinued--I snagged two before they were gone!)

I learned some interesting things while working on this project:  (1) It's almost impossible to get a precise placement and a good print with an already-put-together garment on a gelli plate. (2) Jacquard Textile Paints will wash out pretty well, if you do it right away. I went through a couple of false starts before I got something I was happy with. I did use the gelli plate for the background--rolled out a thin layer of paint and just pressed the fabric randomly onto it for a blotchy, distressed look, which was pretty much what I was going for.


The text is the lyrics of 보리밭 (a song about walking through a barley field). At first I made a big forward-facing stamp (so I could use it on the gelli plate) using puff paint on craft foam, but I just couldn't get the print placed correctly on the skirt. I realized that only way I was going to get a good print and be able to position it just the way I wanted was by direct stamping. So my project went on hold while I made another stamp.


It's hand-cut craft foam glued onto a clear background.  (This took a very long time, and I'll probably never do it again!)  I split it into two narrower stamps, rather than one big one, so I could spread out the gathers on a small amount of fabric and position the stamp. This is still tricky.  Stamping fabric and then making it into a skirt seems like an obvious solution, but I have to wonder if the paint would gum things up. It does get a little stiff.  Worth a try, maybe. 


The middle tier is all text, and then it dips down into the bottom tier in places. I kept that part more indistinct by rolling the paint on the stamp unevenly and then not pressing down on the whole stamp.  I like the look. 


The big stamp is adapted from a Dancheong pattern. I got eight spaced more-or-less evenly around the bottom.


The apple green color is really bright.  I mixed it with some other colors, but it's still pretty bright. It's a good Korean color, though.  And it came out pretty close to what I'd pictured, so I'm happy with it! Now I have a couple of skirts and some ideas for Kate!

Sunday, December 06, 2015

The Paper Lantern Experiment


I've been drooling over papercut lanterns on Pinterest. I've also seen some cool things done with gelli printing on deli paper. Combining the two seemed like a logical progression. I'd been tossing ideas around in my head and decided that the occasion of our book club white elephant gift exchange would be the ideal time to attempt to throw something together. I did not quite get it done in time, what with nativity painting and Cub Scout meeting and whipping up a batch of pretzels, so I brought it home afterwards to finish up.


Kate and I spent Sunday morning before church sitting across the kitchen table from each other, working on our projects. (She's been making Sculpey dragons.) My favorite part was choosing which part of the gelli print to use for each shape. I discovered that it worked better to cut out all the pieces and then glue them in place, to avoid getting glue on the papers while choosing.


I had a battery-powered tea light that I'd picked up at the dollar store. The deli paper is thin but the light turned out to be a lot dimmer and more yellow than what I was wanting. I'll have to see if I can find something that will work better. It does look pretty cool!

Friday, September 11, 2015

Versatex ink (and Gelli Plate stamping)


I've been playing with Versatex Printing Inks (made by Jacquard). I got these after running across a mention on the Gelli Arts blog. (See? They're costing me money!) I was looking for a good fabric paint that I could print with that wouldn't make the fabric stiff. I've seen some very cool things done with gelli printing on fabric, and wanted to try it out myself. I got some white skirts (from Dharma Trading Co.) for myself and Kate, not long ago. I have big plans for these skirts, but I'm too nervous to just jump in and see how they turn out. So I've been experimenting.

These colors are super bright. I used them on the kids' shirts at full strength, but wanted to see what would happen when I tried mixing them. And I wanted to try using a small gelli plate upside-down like a stamp, so I could be more precise about placing the image. (I recently got a 5x7 gelli plate and an acrylic block for just that purpose.)

I got a piece of test fabric, and some little screw-top jars for mixing and storing colors.  I started out with some purple with a little complementary yellow added, to brown it down a bit.   (I was going for something earthy and dusky.) 


First I tried the big plate (on plexiglass), turning the whole thing upside-down on the fabric.  It didn't really work.  You can see the design around the edges, but the middle didn't really print.


I sprayed some water on the plate and then laid the fabric on top, and rubbed it all over.  That was an interesting effect.  I'll bet I can use this.


Other attempts yielded different results--too dark, too light, too contrasty--using more or less ink, and adding water or colorless extender.  This one turned out pretty close to what I was going for.  Just depends on what look you want.  Play around with it!

(You can iron freezer paper to fabric to stabilize it, and to keep the paint from soaking through, which works great if you're able to keep the fabric flat.  If you're working with a big piece that you have to pick up and flop around to lay on your gelli plate the freezer paper just doesn't stay on. Oh well.)


The next day I tried some stamping with my 5x7 plate.  I really wanted to be able to use it upside-down on the fabric.   


It worked, but not as well as I'd like.  I keep getting one spot in the middle that's not printing completely.  I'm still working on that.  I may try just sliding my hand underneath and rubbing the fabric from the bottom.  The fabric does seem to stick to the wet plate pretty well, so it might stay in place well enough to do that.


I was going for a patchwork collage sort of look.  I like how it turned out, except there are a few spots that I think are kind of ugly, and I wasn't able to be really precise with some of my positioning.


After I finished experimenting with my fabric I made myself a color sampler card.  These are full strength and then mixed with the colorless extender and with opaque white.  The last two pretty much just look the same, especially on white paper.  (Colors may look different on your screen!)


Next I made some color mixing samples.  I think this will be useful; some of these colors have undertones that react in unexpected ways.  (These aren't all 1:1 ratio mixes--I went heavier on the yellows.)

My verdict on mixing colors--yes it works, but test your colors first. Make sure they look good together.

I'm excited now about working on these skirts.  I'll probably use a combination of gelli printing and direct stamping.   

Generally I'm pretty happy with the inks.  They're a nice texture to work with, smooth and creamy (except for the opaque white, which has more of a pasty consistency).  They probably don't stay workable for as long as the Golden Open acrylics.  I haven't really tested that.   They don't make the fabric stiff, though it does have a slight plasticky feel to it. Like a silk-screened T-shirt. 

The inks do need to be heat-set after they dry.  You can put some aluminum foil on an ironing board, place the fabric on it painted side down,  and press with a hot iron from the reverse side.  I washed the kids' shirts with the regular laundry after heat setting them, and they look fine.  Seems like good stuff!


Versatex Printing Inks are available in individual colors or in eight-pack starter sets.  (I got both of these... just couldn't resist!)  Here are the Amazon links for the starter packs and the colorless extender:

Monday, September 08, 2014

Gelli Plate Playing

Back in June I was at Michaels looking for a birthday present for a friend of Kate's. I flipped through a book on mixed-media and ran across a mention of the Gelli Plate--a strange and new device that I had not previously heard of. I was intrigued enough to come home and watch some videos about it, and immediately decided that I neeeeeded to get one of these. (The big one, of course). I was expecting some money from the pencil portraits that I had just finished, so I mentally earmarked it for printmaking supplies. (Because who doesn't need more art supplies, right?)


When I got my plate it was a while before I had a chance to play with it.  But the day after the kids went back to school I had a big chunk of time, so I cleared off the table and threw down the drop cloth, and Anne Marie came over and played with me.  (She's my visiting teacher.  Our visits frequently involve a craft project of one kind or another.)  We had a blast, and made a big mess, and Doug made us lunch (which we ate at our little Korean table in the living room).


Not having any idea what we were doing, it was mostly a lot of playing around with color and texture and seeing how it turned out.


I made some stamps ahead of time with craft foam, and we used those a lot.


Draw design on craft foam, cut out, glue to another sheet of foam. The small stamp is made from the negative pieces of the big one.


We got some neat effects with some ferns and weeds that I collected from the yard. If you roll some paint onto the plate, put the leaves down, and then use a scrap sheet of paper to pull off the paint around the leaves, then when you take the leaves off you've got cool leaf prints underneath. (There's also a little dragon stencil that Anne Marie cut out of Tyvek.)


The negative image looks pretty cool too.  (The blue was from an earlier print.)


We tried making some sea creature stencils, too. I'll have to do this again with multiple layers and see how it goes.

Not long after that I got Kate to do some Gelli Printing with me, when we had the day off for Labor Day. I figured she would get a kick out of it. (Mom has fun toys!)


Kate drew the dragon on the plate with a Q-tip.


I made an owl stencil that I wanted to try out, and also some texture pieces with hot glue on non-stick foil. (Non-stick... very important. Tried it with regular foil first and the pieces wouldn't peel off!)


Cat by Kate.


She painted this dragon on the plate and we pulled a print. There was a little bit of dried paint underneath that came off in the green, and gave it some interesting variation.

I tried something a little more complicated for a friend's birthday. I made some stamps and some stencils, and had it all planned out, but getting it to look right turned out to be more tricky than I had anticipated!


I think I went through about a dozen sheets of paper before I got one that I liked.


And of course all the stencils have to be re-positioned every time. (Tyvek is sturdy! And washable.)


Here's the finished product! (I painted the little words on after printing.) It was hard to get the values right in the photo, but that's pretty much what it looked like.

I have lots of other things that I want to try!   The Gelli Plate does take a little getting used to, and figuring out the quirks, but I've seen some really gorgeous things that people have done with it.  And messing around with paint is always fun!